Power Automate: add rows in an excel file with or without a condition
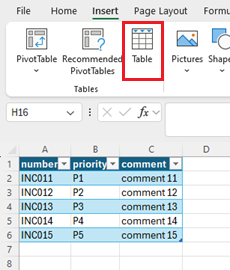
To add rows in an excel file with Power Automate, I need that my data is in a table for both files (source and destination) and located in the cloud (onedrive, sharepoint, etc.):
| Source | Destination |
 |
 |
NOTE:
- If my file is not in the cloud, the Power Automate option will not be active

- The column names should not have more than 20 characters including space(s)
One of the important points to consider is how I start to create my flow:
- In an automatic way: I can create my flow from Power Automate or from excel
- Or in a manual way: I have to create my flow from excel. For this option, I have 2 choices:
- Use a button to trigger my flow (read Power Automate: add a Power Automate button to an excel file)
- Do not use a button to trigger my flow
The beginning is different but once I choose my starting point, to add steps/actions for my flow, the process is identical for all of them so for my article, I will use the “do not use a button to trigger my flow” starting point.
From excel, I will click on “automate work” then on the right side, a template list will appear (left picture) and since I can’t find what I need, I will scroll down to select “see all templates” (right picture):
 |
 |
From here, I will select this option:

NOTE:
- There is no template with a title which contains “… add a row into a table…”
- Make sure to select a template which contains the “manual trigger” and “excel” icons
 |
 |
After validating my connection, I will get this view:

I will change the name of my flow by clicking on the title and put “test add row” and I will delete the “add a row into a table” step:

Starting from now, every steps described below are the same for all starting points. Click on the “+” to add an action then put “excel list row” to select:


Fill all fields:

Click on the “+” then put “apply each” to select:

Click on the field then click on the “lightning” icon to select:


Click on the “+” inside the “apply to each” then put “excel add row” to select:


Fill all fields then click on “advanced parameters”, I will see the column names of my table, I will select all of them:


NOTE: I don’t have to select all of them, for instance, if I want only to add “number” in my destination excel file, I will only select “number”
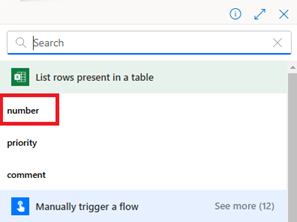
Click in the “number” field then click on the “lightning” icon to select:

I will do the same thing for the others:

NOTE: if I am going to use the dynamic content (“lightning” and/or “fx” icon) for my “file” field:

I will have to put manually the name of my table because Power Automate will not be able to retrieve it:

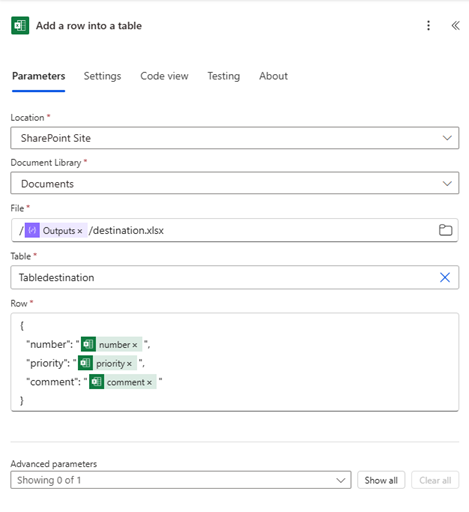
Once done, I will get a new field called “row”:

NOTE: this field appears because in the “advanced parameters”, the column names will not appear so I will have to reference them manually here by using this template code:
{
  "XX": "YY",
  "XX": "YY"
}
NOTE:
- XX: put the name of your column (case sensitive)
- YY: use the “lightning” icon to select the column from the source excel file. For instance:

- To add another line for another column, just copy the first one (the one ending with a coma “,”) because the last line should not contain the coma
I will adapt it to my needs like that:

NOTE: I don’t have to put all of them, for instance, if I want only to add “number” in my destination excel file, I will only put “number”
This is my complete flow:

Once done, save it and I will go back to excel, I will close the right panel then click again on “automate work”, I will see my flow:

By moving my mouse on the right side of my flow, I click on the 3 dots to see those options:

I will click on “run” then just follow the instructions and this is the result in my destination excel file:

NOTE: I may get an error when testing my flow, mainly it is because the excel table is not recognized properly in spite that everything looks fine, recreate the table in a new sheet with the same name for both (sheet and table if you want)
Now what happens if I want to add only some rows ? In this case, in my source excel file, I will add a new column called “to be added” and I will put those values:

So the goal is to add the “yes” rows only to my destination excel file. In this case, I will delete “add a row into a table” then click on the “+” below “apply to each”:

Then put “condition” to select this option:

- In the first “choose a value”, click on the “lightning” icon to select:

- In the second one, put manually “yes” (case sensitive)

Click on the “+” inside “true” to select “add a row into a table” and you know what to do. This is my final flow with condition:

And this is the result of my destination excel file:

Interesting Topics
-

Be successfully certified ITIL 4 Managing Professional
Study, study and study, I couldn’t be successfully certified without studying it, if you are interested...
-

Be successfully certified ITIL 4 Strategic Leader
With my ITIL 4 Managing Professional certification (ITIL MP) in the pocket, it was time to go for the...
-

Hide visual and change background color based on selection
Some small tricks to customize the background colour of a text box...
-

Stacked and clustered column chart or double stacked column chart
In excel, I use a lot the combination of clustered and stacked chart...
-

Refresh Power BI
From the Power BI Service, I can set refresh but, for instance, there is no option to do it monthly or each time a change is made...
-

Power BI alerts to be sent by email from an excel file based on condition
I will explain how to send a list of emails from an excel file after creating alerts...


